Celebrating All Saint’s Day Today :D
In this article I’ll show you how to use an HCSR04 Ultrasonic Distance Sensor attached to a Raspberry Pi to act as a parking sensor for a web app.
So your Raspberry Pi needs Wifi Capabilities for this to follow along.
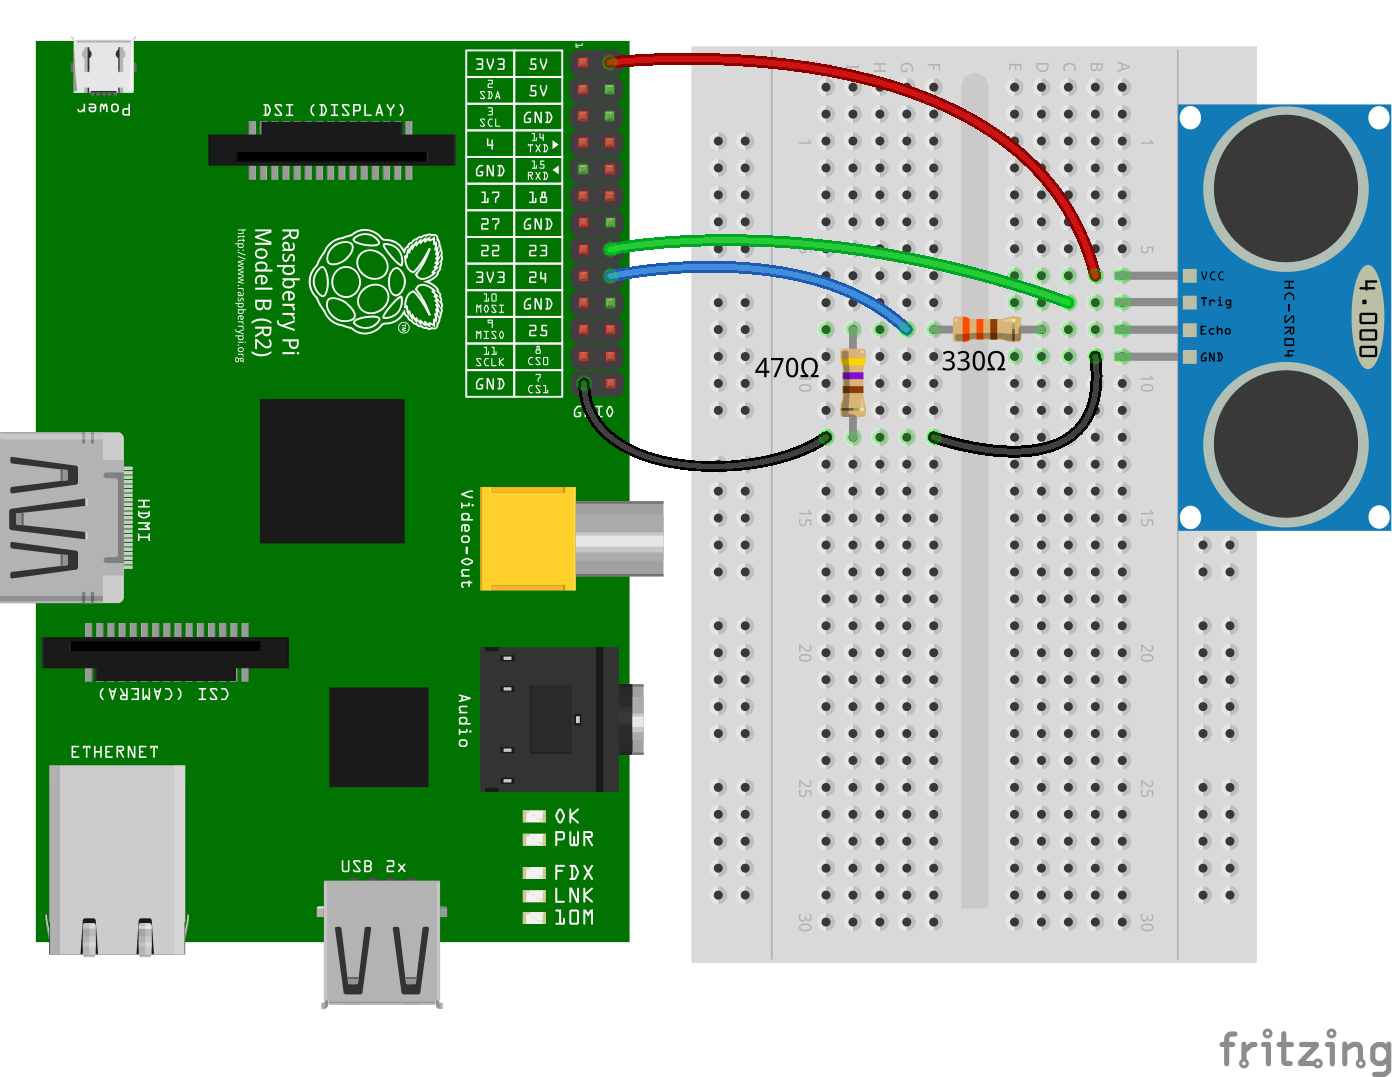
So the Hardware:
- HCSR04 Ultrasonic Distance Sensor
- Raspberry Pi. I recommend an Raspberry Pi 2 or Raspberry Pi 3 or a Raspberry Pi Zero W.
- T Cobbler Breakbout Board for ease of connection. You can use Jumper wires if you prefer
- 470 Ohms and 330 Ohms resistor
And The Schematic which is from the pigpio setup:
Initial Setup for Code
This should be done in you Raspberry Pi
So first create a directory in which to house our code along with initializing npm and installing the pigpio package:
mkdir distance-sensor
cd distance-sensor
npm init // Run through the setup
npm install pigpio
Then create a file called distance-sensor.js with the following code from the pigpio setup:
const Gpio = require('pigpio').Gpio;

// The number of microseconds it takes sound to travel 1cm at 20 degrees celcius
const MICROSECDONDS_PER_CM = 1e6/34321;

const trigger = new Gpio(23, {mode: Gpio.OUTPUT});
const echo = new Gpio(24, {mode: Gpio.INPUT, alert: true});

trigger.digitalWrite(0); // Make sure trigger is low

const watchHCSR04 = () => {
  let startTick;

  echo.on('alert', (level, tick) => {
    if (level == 1) {
      startTick = tick;
    } else {
      const endTick = tick;
      const diff = (endTick >> 0) - (startTick >> 0); // Unsigned 32 bit arithmetic
      console.log(diff / 2 / MICROSECDONDS_PER_CM);
    }
  });
};

watchHCSR04();

// Trigger a distance measurement once per second
setInterval(() => {
  trigger.trigger(10, 1); // Set trigger high for 10 microseconds
}, 1000);
The interesting bit of this code is that it gets the difference between the time the sound reaches the object and the time the sound bounces back to the sensor which all happens in microseconds.
    if (level == 1)
      startTick = tick;
    } else {
      const endTick = tick;
      const diff = (endTick >> 0) - (startTick >> 0); // Unsigned 32 bit arithmetic
      console.log(diff / 2 / MICROSECDONDS_PER_CM);
    }
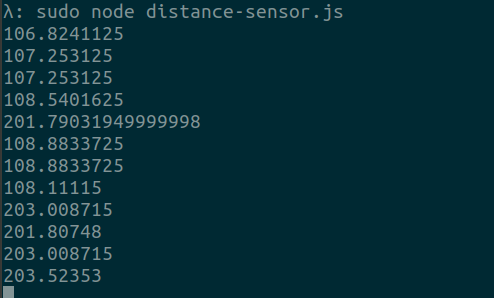
After that run the file with sudo node distance-sensor.js.
It should give you the distance of any object in front of the sensor through your terminal. Otherwise review the wiring and run it again.
Server setup
This should be done in another PC, not your Raspberry Pi
You should have mongodb installed in your PC :
For Linux install mongodb through your terminal:
sudo apt-get install mongodb
sudo systemctl start mongodb
For Windows follow this tutorial to setup mongodb
After Installation clone this code, cd to it, run npm run seed and npm start
git clone https://github.com/Pofay/parking-sensor-example-server.git
cd parking-sensor-example-server
npm run seed
npm start
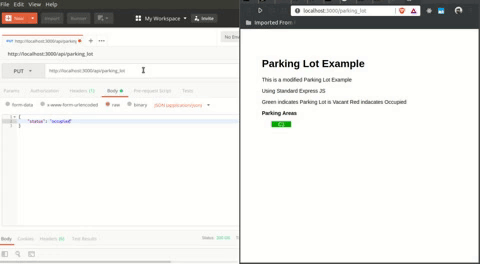
Open a browser and point it to localhost:3000/parking_lot
The web page should display a div element that turns green when vacant and red when occupied in real-time due to socket-io.
Using a tool like Postman point the url localhost:3000/api/parking_lot and set it to PUT
Then send a payload with this structure:
{ status: "vacant" }
Or
{ status: "occupied" }
The Parking Sensor Setup
Now back to your Raspberry Pi in this Setup
The Scenario:
When a vehicle is near or on point to a set maximum distance then we send a occupied request. Otherwise a vacant request.
Although we are not going to be using real vehicles since that would be outside the scope of this article just think of this as a stand-in for the actual thing. We will be using toys or solid objects as our test dummies for this concept.
The Initial Code already has the distance calculation (in cm) so we only need to set a maximum distance in a configuration file so that the sensor can send the appropriate request.
To let our current sensor code send API requests to a server we need a http library. We’ll be going with axios for this.
We’ll also be using dotenv for our configuration so that the maximum distance can be set without touching the code.
Inside of your distance-sensor directory install axios and dotenv through npm:
npm install axios dotenv
First create a .env file with the following contents:
MAXIMUM_DISTANCE=7.08
HOST_IP=<IP of PC that runs server code>
PORT=3000
We set the max distance for testing purposes to 7.08 CM.
Also don’t forget to setup the host ip. It should point to your PC’s local ip. Use ipconfig or ifconfig for Windows and Linux respectively.
Then in your distance-sensor.js require both axios and dotenv:
const Gpio = require('pigpio').Gpio;
const axios = require('axios')
require('dotenv').config()

/* Setup Code */
and then on the echo side:
const url = 'http://' + process.env.HOST_IP + ':' + process.env.PORT + '/api/parking_lot'

echo.on('alert', (level, tick) => {
if (level == 1) {
  startTick = tick;
} else {
  const endTick = tick;
  const diff = (endTick >> 0) - (startTick >> 0); // Unsigned 32 bit arithmetic
  const distance = diff / 2 / MICROSECDONDS_PER_CM;
  if(distance <= process.env.MAXIMUM_DISTANCE)
      axios.put(url, { status: 'occupied' })
           .then(res => console.log(res.status))
           .catch(console.err)
  else
      axios.put(url, { status: 'vacant' })
           .then(res => console.log(res.status))
           .catch(console.err)
})
Whenever the object is close to the set MAXIMUM_DISTANCE it sends an occupied put request. Otherwise a vacant put request.
The full code:
If you’ve got it right so far placing an object in front of the sensor (approximately 7 cm) will now cause the div element to turn red. Otherwise its green.
Some Tips
This setup is nice and all, but the sensor keeps on sending put requests every second. Although this might just be one example if you’ve got many requests going through the API then there might be performance drawbacks.
You could use the State Pattern to do one off requests in that it only sends the request once per vacant and occupied change. My parking-sensor uses this approach to limit the number of requests per second.
Or you could use Event-Emitters to do this job.
Anyways I hope you’ve learned something today and happy tinkering and coding!.
Comments